
MSA 구조에서는 각 서비스들이 독립적으로 존재하기 때문에,이들 간의 원활한 통신을 위해 Service Discovery와 API Gateway가 필요합니다.
서비스 디스커버리는 각 서비스의 위치를 찾는 방법을 제공하고, API 게이트웨이는 클라이언트와 서비스 간의 통신을 관리합니다.
이 두 가지를 요소를 MSA에 적용해보겠습니다.
✅ Service Discovery
- MSA와 같은 분산 환경에서는 각 서비스가 서로를 찾고 통신하는 것이 중요합니다.
- 서비스 디스커버리는 각 서비스의 IP 주소나 포트 등 위치 정보를 중앙 레지스트리에 등록하고 관리함으로써, 서비스 간 동적인 위치 확인을 가능하게 합니다.
- 서비스 디스커버리는 클라이언트가 서비스의 정보를 알 필요 없이 서비스를 찾을 수 있도록 도와줍니다.
📌 Client-Side-Discovery & Server-Side-Discovery
Service Discovery는 크게 두 가지 방식으로 나눌 수 있습니다.
1. Client-Side-Discovery
- 클라이언트가 서비스의 위치를 직접 찾는 방식입니다.
- 클라이언트는 서비스 레지스트리에서 서비스의 위치를 조회하고, 해당 서비스에 직접 요청을 보냅니다.
장점
- 각 서비스의 소스 레벨에서 Service Discovery를 구현할 수 있어 상대적으로 간단하다.
- 서비스별로 특성에 맞게 로드밸런싱 방식을 구성할 수 있다.
단점
- 클라이언트가 서비스의 위치를 알아야 하므로, 클라이언트와 서비스 간의 의존성이 증가한다.
- 서비스가 추가되거나 변경될 때 클라이언트도 함께 변경해야 한다.
- 언어가 다를경우 언어 및 프레임워크에 맞게 별도로 관리해줘야 한다.
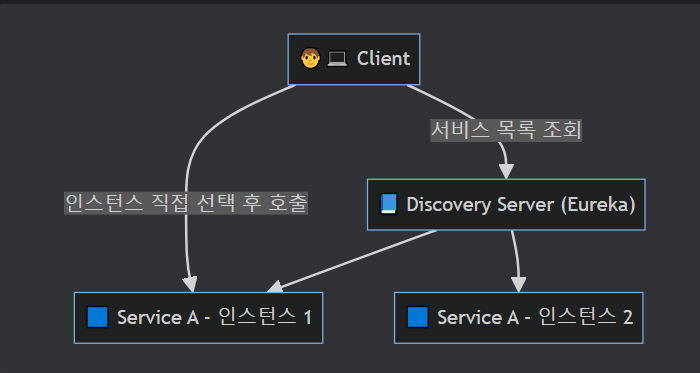
2. Server-Side-Discovery
- 클라이언트가 서비스의 위치를 찾지 않고, 서버가 클라이언트의 요청을 받아서 서비스에게 라우팅 해주는 방식입니다.
- 서버는 서비스의 위치를 조회하고, 해당 서비스에 요청을 전달합니다.
장점
- 클라이언트와 서비스 간의 의존성이 줄어듭니다.
- 서비스가 추가되거나 변경될 때 클라이언트는 변경할 필요가 없습니다.
- 서버에서 로드밸런싱을 처리할 수 있습니다.
단점
api gateway나load balancer와 같은 추가적인 홉이 필요합니다.

📌 Eureka를 이용한 Service Discovery 구현
Spring Cloud Netflix Eureka를 이용하여 Discovery Server를 구현하겠습니다.
1. Eureka Server 의존성 추가
1
2
3
dependencies {
    implementation 'org.springframework.cloud:spring-cloud-starter-netflix-eureka-server'
}
위와 같이 eureka-server 의존성을 추가합니다.
2. Eureka Server 설정
1
2
3
4
5
6
7
8
9
10
@SpringBootApplication
@EnableEurekaServer
public class EurekaApplication {

  public static void main(String[] args) {
    SpringApplication.run(EurekaApplication.class, args);
  }

}
@EnableEurekaServer 어노테이션을 추가하여 Eureka Server를 활성화합니다.
3. application.yml 설정
1
2
3
4
5
6
7
8
9
10
11
12
13
14
15
16
17
18
19
20
21
22
23
24
25
26
27
28
29
server:
  port: 0

spring:
  application:
    name: discovery-server

eureka:
  client:
    register-with-eureka: false
    fetch-registry: false
    serviceUrl:
      defaultZone: http://localhost:3333/eureka

  server:
    # 유레카 서버가 다른 유레카 서버와 동기화할 때 대기하는 시간
    wait-time-in-ms-when-sync-empty: 5

  instance:
    # 여러 개의 프로젝트를 실행할 때 유레카 서버에서 각각의 인스턴스를 식별하기 위해 설정
    # 'random.value를 활용하여 랜덤 값을 생성해 각 인스턴스를 고유하게 식별
    instance-id: ${spring.cloud.client.hostname}:${spring.application.instance_id:${random.value}}

management:
  endpoints:
    web:
      exposure:
        include: "*"
server.port: 0으로 설정하여 랜덤 포트로 실행
register-with-eureka, fetch-registry 는 Eureka 서버가 자신을 다른 서버에 등록하거나, 레지스트리를 가져오지 않도록 설정하는 옵션입니다. 서버 자체이기 때문에 클라이언트 역할은 하지 않기 때문입니다.
📌 Eureka Client 설정
각 서비스에서 Eureka Client를 설정합니다.
1. Eureka Client 의존성 추가
1
2
3
dependencies {
    implementation 'org.springframework.cloud:spring-cloud-starter-netflix-eureka-client'
}
2. Eureka Client 설정
1
2
3
4
5
6
7
8
9
@SpringBootApplication
@EnableDiscoveryClient
public class UserApplication {

  public static void main(String[] args) {
    SpringApplication.run(UserApplication.class, args);
  }

}
@EnableDiscoveryClient 어노테이션을 추가하여 Eureka Client를 활성화합니다.
3. application.yml 설정
1
2
3
4
5
6
7
8
9
10
11
12
13
14
spring:
  application:
    name: user-service

eureka:
  instance:
    prefer-ip-address: true
    instance-id: ${spring.application.name}:${spring.application.instance_id:${random.value}}

  client:
    register-with-eureka: true
    fetch-registry: true
    serviceUrl:
      defaultZone: http://localhost:3333/eureka
📌 Eureka Client 확인
1
2
3
4
2025-04-18T09:08:00.818+09:00  WARN 39916 --- [discovery-server] [get_localhost-0] c.n.eureka.cluster.ReplicationTask       : The replication of task API-GATEWAY/host.docker.internal:api-gateway:3334:Cancel@localhost failed with response code 404
2025-04-18T09:08:00.818+09:00  WARN 39916 --- [discovery-server] [get_localhost-0] c.netflix.eureka.cluster.PeerEurekaNode  : API-GATEWAY/host.docker.internal:api-gateway:3334:Cancel@localhost: missing entry.
2025-04-18T09:08:31.661+09:00  INFO 39916 --- [discovery-server] [nio-3333-exec-6] c.n.e.registry.AbstractInstanceRegistry  : Registered instance API-GATEWAY/api-gateway:d04cac58e950189a03a45299d80e55f2 with status UP (replication=false)
2025-04-18T09:08:32.183+09:00  INFO 39916 --- [discovery-server] [nio-3333-exec-7] c.n.e.registry.AbstractInstanceRegistry  : Registered instance API-GATEWAY/api-gateway:d04cac58e950189a03a45299d80e55f2 with status UP (replication=true)
서버가 정상적으로 등록되는것을 볼 수 있다.
멀티 모듈 환경에서 총 4개의 서비스를 실행했습니다.
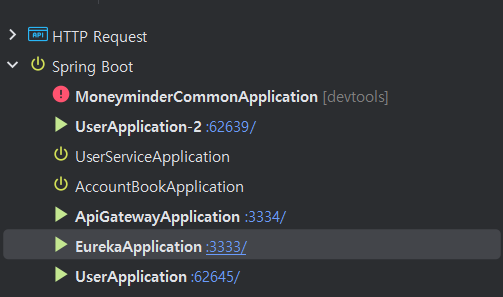
http://localhost:3333/eureka 에 접속하여 Eureka Server에 등록된 서비스들의 정보를 확인할 수 있습니다.

✅ Api Gateway
- API Gateway는 클라이언트와 서비스 간의 통신을 관리하는 역할을 합니다.
- 클라이언트는 API Gateway에 요청을 보내고, API Gateway는 해당 요청을 적절한 서비스로 라우팅합니다.
즉, MSA의 서비스들에 접근하기 위해서는 모두 API Gateway를 거쳐야 합니다.
API Gateway에 공통 관심사를 처리할 수 있습니다. (인증, 로깅, 모니터링 등)
📌 Netflix Zuul vs Spring Cloud Gateway
Netflix Zuul- Netflix에서 개발한 API Gateway입니다.
- Spring Cloud Netflix에 포함되어 있습니다.
- Java 기반으로 작성되어 있으며, Spring Boot와 쉽게 통합할 수 있습니다.
- 비동기 처리를 지원하지 않습니다.
- HTTP 요청을 처리하는 데 적합합니다.
Spring Cloud Gateway- Spring에서 개발한 API Gateway입니다.
- Spring WebFlux를 기반으로 작성되어 있으며, 비동기 처리를 지원합니다.
- HTTP 요청과 WebSocket 요청을 모두 처리할 수 있습니다.
- Spring Boot와 쉽게 통합할 수 있습니다.
Spring에서
Netflix Zuul에 관한 지원(유지보수)을 중지했기 때문에Spring Cloud Gateway를 사용하겠습니다.
📌 Spring Cloud Gateway 동작 원리
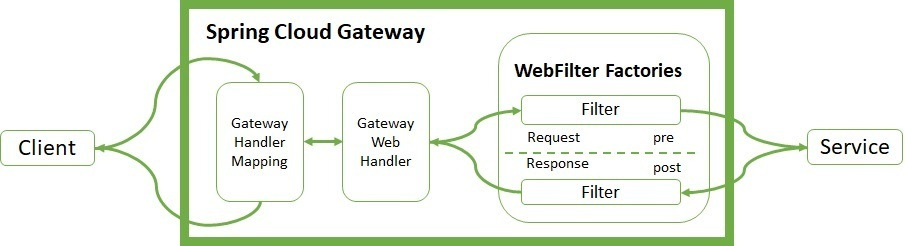
- Client는 Spring Cloud Gateway 서버로 요청을 보냄
- Gateway Handler Mapping에서 요청이 매핑된다고 판단하면 Gateway Web Handler로 요청을 보냄
- Gateway Web Handler는 매핑되는 요청을 위한 요청 필터 체인을 거쳐 요청을 실행함
- 프록시된 서비스로 라우팅함
- 프록시 서비스가 실행되고 Response를 반환한다.
- Gateway Web Handler는 응답 필터 체인을 거쳐 클라이언트에게 응답을 반환함
위와 같은 과정들이 발생한다.
📌 Spring Cloud Gateway 적용
1. Spring Cloud Gateway 의존성 추가
1
2
3
dependencies {
    implementation 'org.springframework.cloud:spring-cloud-starter-gateway'
}
2. @EnableDiscoveryClient 어노테이션 추가
1
2
3
4
5
6
7
8
9
@SpringBootApplication
@EnableDiscoveryClient
public class ApiGatewayApplication {

  public static void main(String[] args) {
    SpringApplication.run(ApiGatewayApplication.class, args);
  }

}
3. application.yml 설정
1
2
3
4
5
6
7
8
9
10
11
12
13
14
15
16
17
18
19
20
21
22
23
24
25
26
27
28
29
30
31
32
33
34
35
36
37
38
39
40
41
42
43
server:
  port: 0

spring:
  application:
    name: api-gateway
  main:
    web-application-type: reactive
  cloud:
    gateway:
      routes:
        - id: account-book-service
          uri: lb://account-book-service
          predicates:
            - Path=/account-book/**
        - id: user-service
          uri: lb://user-service
          predicates:
            - Path=/user/**

eureka:
  instance:
    prefer-ip-address: true
  client:
    register-with-eureka: true
    fetch-registry: true
    serviceUrl:
      defaultZone: http://localhost:3333/eureka


management:
  endpoints:
    web:
      exposure:
        include: "*"


auth:
  token:
    secretKey: sadfasdfsafdsadfsadfsafdsafdsafdsafdsafdsafdsafdsafdsafdsafsadfsadfsafdsadfsafdsadf
    accessTokenExpiry: 9900000
    refreshTokenExpiry: 604800000
server.port: 0으로 설정하여 랜덤 포트로 실행spring.cloud.gateway.routes: 라우팅 설정id: 라우팅 IDuri: 서비스 URL (lb://{서비스 이름}) - Eureka에서 등록된 서비스 이름을 사용predicates: 요청 경로에 대한 조건 설정
token: api-gateway에서 인증 처리를 위한 설정값
4. 인증 필터 구현
1
2
3
4
5
6
7
8
9
10
11
12
13
14
15
16
17
18
19
20
21
22
23
24
25
26
27
28
29
30
31
32
33
34
35
36
37
38
39
40
41
42
43
44
45
46
47
48
49
50
51
52
53
54
55
56
57
58
59
60
61
62
63
64
65
66
67
68
69
70
71
72
73
74
75
76
77
78
79
80
81
82
83
84
85
86
87
88
89
90
91
92
93
94
95
96
97
98
99
100
101
102
103
package com.moneyminder.filter;

import com.moneyminder.dto.JwtClaims;
import io.jsonwebtoken.Claims;
import io.jsonwebtoken.Jwts;
import io.jsonwebtoken.io.Decoders;
import io.jsonwebtoken.security.Keys;
import jakarta.annotation.PostConstruct;
import org.springframework.beans.factory.annotation.Value;
import org.springframework.cloud.gateway.filter.GatewayFilter;
import org.springframework.cloud.gateway.filter.factory.AbstractGatewayFilterFactory;
import org.springframework.http.HttpStatus;
import org.springframework.stereotype.Component;
import org.springframework.util.AntPathMatcher;
import org.springframework.util.PathMatcher;

import java.security.Key;
import java.util.List;

@Component
public class GlobalAuthFilter extends AbstractGatewayFilterFactory<GlobalAuthFilter.Config> {

    private final PathMatcher pathMatcher = new AntPathMatcher();
    private static final List<String> EXCLUDED_PATHS = List.of(
            "/api/auth/**",
            "/login/**",
            "/oauth2/**",
            "/swagger-ui/**",
            "/health/**",
            "/actuator/**"
    );

    @Value("${auth.token.secretKey}")
    private String secretKey;

    private Key key;

    @PostConstruct
    protected void init() {
        byte[] keyBytes = Decoders.BASE64.decode(secretKey);
        this.key = Keys.hmacShaKeyFor(keyBytes);
    }

    public GlobalAuthFilter() {
        super(Config.class);
    }

    @Override
    public GatewayFilter apply(Config config) {
        return (exchange, chain) -> {
            String path = exchange.getRequest().getPath().value();

            if (isExcludedPath(path)) {
                return chain.filter(exchange);
            }

            String token = exchange.getRequest().getHeaders().getFirst("Authorization");
            if (token == null || !token.startsWith("Bearer ")) {
                exchange.getResponse().setStatusCode(HttpStatus.UNAUTHORIZED);
                return exchange.getResponse().setComplete();
            }

            String jwt = token.substring(7);

            JwtClaims claims;
            try {
                claims = parseClaims(jwt);
            } catch (Exception e) {
                exchange.getResponse().setStatusCode(HttpStatus.UNAUTHORIZED);
                return exchange.getResponse().setComplete();
            }

            exchange.getRequest().mutate()
                    .header("X-USER-EMAIL", claims.email())
                    .header("X-USER-NAME", claims.name())
                    .header("X-USER-ROLE", claims.role())
                    .build();

            return chain.filter(exchange);
        };
    }

    private boolean isExcludedPath(String path) {
        return EXCLUDED_PATHS.stream().anyMatch(pattern -> pathMatcher.match(pattern, path));
    }

    private JwtClaims parseClaims(String token) {
        Claims claims = Jwts.parserBuilder()
                .setSigningKey(key)
                .build()
                .parseClaimsJws(token)
                .getBody();

        String email = claims.getSubject();
        String role = (String) claims.get("authority");
        String name = (String) claims.get("name");

        return JwtClaims.create(email, role, name);
    }

    public static class Config {
    }
}
API Gateway에서는 인증을 처리하기 위해 크게 Global Filter와 Gateway Filter 두 가지를 사용할 수 있습니다.
Global Filter- 모든 요청에 대해 작동하는 필터로, 전역적으로 적용됩니다.
- 예를 들어, 모든 요청의 로깅이나 공통적인 인증 작업을 수행할 때 사용됩니다.
Gateway Filter- 특정 라우트에만 적용되는 필터로, 라우트에 지정된 필터로서, 요청과 응답의 처리를 세밀하게 조정할 수 있습니다.
- 예를 들어, 특정 서비스에만 적용될 요청 변환이나 헤더 추가 작업을 수행할 때 사용됩니다.
저는 Global Filter를 사용하여 모든 요청에 대해 인증을 처리하도록 구현했습니다.
인증처리하지 않을 Path를 제외하곤, 항상 토큰을 검증하여 헤더에 사용자 정보값을 담아 서비스로 라우팅해줍니다.
위와같이 처리한 이유는 다음과 같습니다.
- 인증을 처리하는 서비스가 여러개일 경우, 각 서비스마다 인증을 처리하는 코드를 작성해야 합니다.
- API Gateway에서 인증을 전역적으로 처리함으로써, 인증 로직의 중앙 집중화가 가능해집니다. 각 마이크로서비스는 인증에 대한 책임을 가지지 않고, 비즈니스 로직에만 집중할 수 있게 됩니다.
✅ 마치며
이번 포스팅에서는 Service Discovery와 API Gateway를 활용하여 MSA 환경에서의 서비스 간 통신 구조를 설계하고, 인증 필터까지 적용하는 과정을 다뤄보았습니다.
Eureka를 통해 동적으로 서비스 인스턴스를 등록/조회할 수 있도록 구성하였고,
Spring Cloud Gateway를 통해 서비스들 앞단에서 공통 처리를 할 수 있도록 구성하였습니다.
Global Filter를 활용하여 인증 필터를 구현하고, 토큰 검증 및 사용자 정보 전달을 간편하게 처리했습니다.
이제 기본적인 MSA 환경 구성이 완료되었고, 다음 단계로는 서비스 간 통신 방식(FEIGN, REST 등), 서킷 브레이커 및 장애 대응 등을 구현해보겠습니다.